Aug 20, 2015

2015 Swap Blocks-June and July

I am a month behind posting pictures of swap blocks since I took a blogging vacation last month. These are June's blocks. Anne did an extra one this month-that's the reason there are 17.


And these are July's blocks. Anne did another extra block this month too and I did two extra.


We only have four more months and this year's swap will be finished. They are fun and easy blocks to make. I still need to sew last year's swap blocks together!! No surprise there!

Aug 14, 2015

Back To School Time

It's that time of year again-back to school. This summer has been extremely hot, with highs in the 90's for weeks on end and heat index readings of 105-115*-pure misery. We have had some pool time, but some days it was like swimming in a bath tub and not refreshing at all. 

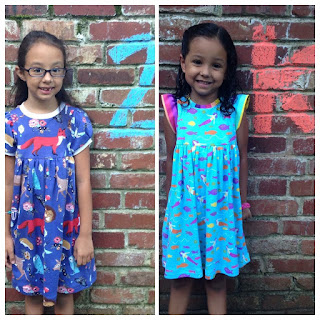
I think all of the kids have looked forward to going back to school to see their friends. Sofia and Chloe were the first two to start school-on August 3. Sofia is in 2nd grade and Chloe was so excited to be in kindergarten this year. Their mom made them each special new dresses for the first day. 


On Saturday, August 8, we had our 6th annual back to school tea. This year my daughter, Melissa, was the hostess. We had such a good time eating finger sandwiches, scones, and fruit and sipping peach tea. 


Our family is getting bigger (and older) every year! At almost 10 months, this was Gabby's first tea and this year we have seven who are going to school! Our back to school tea is a family tradition that we all enjoy so much! 

Melissa got out the china that was her great grandmother's to set a special table-isn't it perfect for a tea party? This is the kid's table-


Yesterday Ella and Ollie headed off to preschool. Ella is in the 3K program this year, though she turns 4 in September. Ollie is starting school for the first time ever this year. At 2 1/2, he has been going to preschool to drop his sisters off his whole life and he was very excited about staying to play. Melissa made Ella's dress and Ollie's shorts and shirt, too.


The last ones to start back to school were the three oldest. This morning Katelyn, Emily and Madison headed out the door to 7th, 5th and 4th grade. It seems like just yesterday they were in preschool. 


Now it's time for field trips, soccer games, and homework. It will be Christmas before you know it!

Have a great school year! I love you all, 

Grammy

Aug 12, 2015

My Gorgeous Wooden Seam Ripper


Three weeks ago I went to South Carolina to see my two BFFs, Pam and Anne. There was a "vendor only" quilt show going on in Columbia and it was a great excuse for us to get together. 

I bought a few fat quarters here and there at the show. Shopping was not the point of the trip-being with my friends was.

And the point of this blog post isn't to chat about the trip or the quilt show, but to share with you the new seam ripper that Anne gave me (she gave a similar one to Pam too). It is absolutely gorgeous and is a piece of art. 


Anne has a friend in her guild named Carol Fischbach. Carol's husband, Woody, turned the wood on his lathe and made this beauty. Carol brought some to their quilt guild meeting and the ladies went crazy for them! Anne bought several seam rippers and spool holders. (After they sold them all, Woody turned around and donated ALL the money to their guild!! Wasn't that sweet?)

Pam and I are ecstatic! They are SO beautiful! I wish you could feel how smooth and polished the wood is. Mine is made of maple. It has now actually become a pleasure to have to rip a seam. I have to admit that I have used it several times already. :)


In case you've never seen one before, I'll show you how it's made. The seam ripper pulls out of its wooden holder, and then you turn it around and put the non-ripper end back into the wood.


I can wear the necklace around my neck to keep my ripper close at hand, but when I need to use it, it easily pulls off, because it is held on with a magnet.


Anne also bought me a spool holder that Woody made. It is just as pretty to look at and fun to use. 


It's wonderful for those spools of thread with the large center holes or for thread cones. It keeps them from rattling around on your spindle.


Here it is sitting on my machine. Doesn't it make my spool of thread look fancy?


I'm such a lucky girl. Thank you so much to my dear friend, Annie.

Aug 10, 2015

Free Fabric!

I love my local quilt shop, A Scarlet Thread! The owners, Ken and Karen Taylor, have created an atmosphere where shopping is so much fun. Their employees, who they call their "quilt divas", are warm, welcoming, friendly, knowledgeable, and helpful. They cater to their customer's every whim. There are several times I have mentioned something new on the quilt market and they either (a) already have it in the store (b) have it ordered and it's on its way or (c) get it in stock because I mentioned it. What more could you ask for in a quilt shop? How about FREE FABRIC? 

Last week was A Scarlet Thread's 9th birthday. In those nine years they have been in three locations and each has gotten bigger and even better, but has never lost the personal touch they are known for. They celebrated with three days of "Buy 9 yards, get 9 yards free"! Who could possibly pass that up???

Not this girl! I need more fabric like I need another hole in my head, but I could not let this opportunity go by without taking advantage of it.


I had no idea what I was going to buy when I walked in the door, but I don't ever have to look hard to find something I "need" for my stash. Since I am so drawn to polka dots these days, I picked out grey, yellow, red and blue dots and got a yard of each. I found a terrific green that would be wonderful in my new "brights" stash. Two Kim Diehl fabrics, two neutrals and three Kansas Troubles rounded out my purchases. I bought four yards of two of the KT to use for backings. Two of the bolts I bought had a small amount left after my one yard purchase, so I went ahead and bought it too. My total yardage ended up being 18 3/4 yards. 

I had done some rough math at home before I left. The fabrics were approximately $12/yard and I was going to be paying for nine yards. That's rouhly $108 + tax. Plus I was getting nine more yards for free! Sweet!!! To make it all even better, I had a $100 gift certificate from my mother-in-law to spend! 

So, with tax and after my gift certificate, I spent a grand total of $28.30 for 18 3/4 yards of fabric!! Win-win!! I am a happy camper.  :)

Disclaimer-The opinions expressed in this blog post are mine. A Scarlet Thread has not sponsored this post or paid me in any way for writing this. 


Aug 7, 2015

A Bit of Scrap Management

I have done a complete 180 in my quilting lately. I have decided put my usual Civil War reproduction fabrics aside for a little while and to make some quilts using bright and cheerful fabrics. I have really enjoyed purchasing new fabrics and picking out new quilt patterns to make. A lot of the quilts I want to make are very scrappy, so I decided that a bit of scrap management was also in order.

Here's  a picture I took of the mountain of scraps that I started with. I had been stuffing them into a LARGE bag for years! I started by sorting them by color, but decided that wasn't going to work best.


So then I resorted by sizes. I put small scraps in one pile, larger scraps in another and strips in a third. I spent days and days trimming all of my scraps into the largest possible usable pieces. As I trimmed I then sorted them by color. When I was finished this is what I had-usable scraps!!


I also had this!!!


All those trimmings overflowed my little trash can.


My cutting mat was a huge mess too. I had to clean it with a lint brush to get all the threads off.


Of course, now that I had all these neatly trimmed scraps I needed a place to store them and keep them sorted. My husband said I am the only woman who would spend money to store something that most people would throw away! I beg to differ.  :)

I found this great rolling cart with ten shallow drawers that fit my scraps to a tee. Each drawer is about 15X13"-perfect for my needs. I got it here from Amazon-it shipped free with Prime and I got it in two days, which is great, because I was very impatient to get these scraps put away. Some assembly was required (OK, I had to put the whole thing together, but it only took about 15 minutes.) I had the perfect little spot for it too.


I'm able to fit two colors of scraps per drawer.


Pinks and reds are in the top drawer. Teals and blues are in drawer number two.


Green and yellow share the third drawer. My emptiest drawer houses my orange and purple scraps. They are my least favorite colors, so I don't buy many, though lately I have found myself buying some oranges. My friends are all shocked. :)


I saved a drawer for all the whites and creams with different color prints on them. Blacks and browns were my last two piles.


Since I had "extra" drawers I decided to put all of my 1930's reproduction scraps in a drawer all their own. I also saved a drawer just for all the scrap strips I had cut. I MAY go back later and mix them in by color, it will depend on how I find myself using them. For now, they are here.


Since I have SO many Civil War reproduction fabrics I thought the last two drawers could be used for them, but I was in for a surprise. Not only did they not all fit, I still have a basket full of scraps! 


After all the time I spend cutting and sorting scraps, I have managed to find a LOT more fabrics scraps that need my attention! For the time being, they are going to just hang out on the top of the scrap drawers. Those will be for another day. At least I have made some progress.....


Happy organizing! 

Aug 5, 2015

Gabby's Fish Quilt-FINISHED AT LAST!


I am beyond thrilled to finally be finished with this quilt. Gabby was born last October and is now 9 1/2 months old. It's way past time for her to have her baby quilt!


I had the pattern printed out and had purchased all the fabrics. I had finished another project I was working on and was ready to start Gabby's quilt. It was six weeks until she was due. That was plenty of time to get it finished before she was born. But the night before I was going to start working on Gabby's quilt I broke my arm. I had surgery and spent eight weeks in a cast, recuperating. When I finally got the cast off and had the strength back in my hand and arm, I was anxious to start working on it!


The blocks were fun to make! I loved the subtle fish. But, these blocks were on point....AND I decided to make the quilt just a tiny bit bigger and add one more fish all the way around the outside. This got me into trouble because now I had no idea how to finish the quilt. I needed to add rectangles or triangles or something to make this odd shaped top into a rectangle. Since I had only made one other quilt on-point I was stumped. It sat on my design wall for ages. I thought I could figure it out on my own. I tried two different solutions-and neither worked. Lots of ripping going on. I finally had a quilting friend over for a visit and we put our heads together, discussed it at length and figured out how I needed to finish it. 

It was the hardest quilt top I EVER finished!! It felt so good that I met this challenge and be able to get it done. I was even inspired to make the back of the quilt special too. When the front was finished I had extra fish left over and decided to add them to the back. This was a first for me.


I am so tickled with how it turned out, though it did make it thicker to quilt through, with all those seams.  My next hurdle was the rickrack. I thought it would be cute in the binding, but had never added rickrack to a quilt top before, so this was just one more "first" for this quilt!  


After the fish quilt was finished I had some scraps left and decided to make a smaller quilt with them. I even had three more fish I could throw in. Simple four patch blocks went together quickly. I made this quilt, start to finish, in just four days. It's 36X40"-just the right size for Gabby to nap with.  My son and daughter-in-law were surprised when I had not one, but two, quilts for Gabby. I figured they had waited so long a little bonus quilt was in order. 


I'm so glad Gabby finally has her quilts and can start making memories with them!


Aug 3, 2015

Low Volume Quilt Top Finished

OI took a break from blogging for a month and got a lot of sewing, quilting and organizing done. I guess it just proves that I either have time to blog or time to sew. I'm not much of a multi-tasker. Or maybe blogging just wasn't one of the many tasks I tackled this month.

I have a lot of projects to blog about and so I will try to do quite a bit of writing in the next few days and have the posts scheduled for three or four a week until I get caught up.


My low volume quilt top is one thing I finished. The more I worked on it, the more I loved this quilt. So, it's now next in line to be quilted and that makes me happy! I can't wait to get it finished and use it. It 60X80-the perfect snuggle size! 


I have a light blue fabric for the backing and a cute fabric that is printed on the diagonal for the binding. It's going to make it look like I cut bias binding. I love that look-but I don't have the patience to make it. So, a fabric printed that way is a win~win! 

I'm spending my days with my three oldest granddaughters for the next two weeks until school starts, (their mama started a new full time job today) so I'm not sure how much of an opportunity I will have to get this sandwiched and ready to quilt. But, if I have a few hours on Sunday afternoon, I'll be right on it! The excitement is building.....

Happy Quilting!