Nov 25, 2013

Chevron Teaser

I have started another quilt with a short deadline! Why do I always put things off to the last minute???

I have decided to try my hand at a quick Chevron quilt. Since it is all half square triangle blocks and I love making HST, it should go quickly. Please---let it go quickly!!!!

I have all 252 blocks made, but I need to square up about 100 of them and then the assembly begins. I need to have it finished by Thursday! Oh, wish me luck!

Here is a sneak peek--and no, it's not a Halloween quilt. I'll show you more pics when I'm finished.


Nov 21, 2013

Progress on The Ornamental Kale Block

I have been stitching in the evenings and making good progress on my Ornamental Kale block. I did have to re-arrange my pieces more times than I liked to get the balance just right on both sides-there are a LOT of pieces to fit on this block! This is definitely the hardest block on this quilt! 


If I keep up this pace I will have this block done before Christmas and just may be able to start another.

Last week my friend Pam came to visit. Since she is also making the When The Cold Wind Blows quilt, she brought her blocks and we spread both of ours out in the guest bedroom. She put hers on the bed and I spread mine on the floor. The pics are not good because it was night, I used my cell phone, and I had to stand in a chair to get the whole quilt in the picture-but I wanted to show you what we have gotten done. 


Pam's background fabric is much darker than mine and really makes her applique "pop". Each block's fabric is different and they are all sampler pattern fabrics by MInnick and Simpson. I love the way it looks--so old fashioned and yummy!!! As you can tell-Pam is on the very last block-she is very driven and gets more done in a day than I do in an entire week.


These are my blocks. I still have two more to go when I finish this one. But I am really excited about getting this quilt done. As I work on each block I think about how I want to quilt it. I'm coming up with fun ideas and hope that I'm able to pull it off when the time comes!

Nov 11, 2013

Staircase Make-over

I have been in a wild and crazy decorating mood for the past few months. I get these spurts of energy..... or creativity..... or desire.....I'm not really sure what to call them. But every now and then I just need a little change and then I'm satisfied with the status quo for a bit longer.

I am also a Pinterest fanatic and I found some inspirational pics there for my next project. Something to fill the blank wall going up my stairs. 


I think you can see where I am going with this. I showed my husband the pictures and he really liked the idea of the judge's paneling on the wall too (in the first two pics) so we each had a part on this project. After looking at lots of pictures I decided that I wanted to use all black frames with white, black or no matting and do all of my pictures in black and white. 

I started collecting frames of different sizes and shapes while my husband went to work on the wall. I couldn't do my project until he finished his. His part came out great!!! Now it was my turn to add the frames and complete the wall.


When it was time to hang the frames I used this method, which I saw on several blogs and Pinterest posts. It worked great!


The only problem with my end of this project is that I don't have pictures in the frames yet! I keep saying that I need to get on my daughters' computers and download a bunch of pics of the grandkids that they have taken.  But there just doesn't ever seem to be a good time to do it! I really want this finished before I decorate for Christmas-so I guess that just gives me a few weeks! I need to get busy!!

Here is my semi-finished project..a wall of frames and only one picture!! Can you spot the real photo?


And this is how the whole wall looks now. It doesn't take a lot of imagination to figure out that it was pretty plain along this wall before we did all this work. A little eye candy goes a long way.


Edit:

My friend Hope sent me a picture that she took when she was visiting earlier this year. She said it's my before picture, so I had to share with you. 


Nov 5, 2013

The Holly Leaf block

I have FINALLY finished the sixth block of my When The Cold Wind Blows (Love Letters) quilt. This one took me seven months-but not because it was all that hard or time consuming, but because I put it down for about five months and didn't work on it at all! That is not the way to get a quilt block done in a timely manner. 

This block didn't offer a lot a challenge-it was pretty much the same shape over and over again. But that's okay because by the time you have appliqued that many holly leaves down, you have pretty much perfected the shape. There are 73 pieces of fabric to applique in this block-the most of any block in the quilt. And that is a LOT of applique to go into a 28" square. 


The circles were a lot of fun to make.  I used Karen Kay Buckley's Perfect Circles to make them. They were the easiest circles I have ever done-at 7/8" each they were small, but not tiny. And Perfect Circles makes them so easy to do. I not only made the 34 I needed for my block, I made another 34 circles and mailed them to a friend that was working on the same block! If you haven't tried Perfect Circles, I highly recommend them. You can see tutorials and instructions for them online-just give them a Google. 

Here is a close up of some of the circles that I made for this block. They are about as perfectly round as I can get an applique circle. 

The next block I am making is called the Ornamental Kale. It has 71 pieces to it, which seems like it would be a snap after the 73 on the Holly Leaf, but these are layered flowers, which is always a bit more work. Here is a picture of the finished block from the book.

And here is a picture of the placement diagram. It gives you a better idea of exactly how many pieces are in each of those flowers! 


I have all of my pieces cut out and I'm ready to place them on my background today. I hope to start working on it tonight while I'm watching Grey's Anatomy. I have set a goal to have this block finished by the end of the year. We have Thanksgiving at my sister-in-law's house, so that frees up some time for me since I'm not hosting here. So, I just have Christmas gifts to make, shopping, decorating, wrapping, cooking.........

Yeah, maybe I need to rethink that self-imposed goal.

Nov 1, 2013

Chalk Paint Makeovers

I have recently discovered Annie Sloan chalk paint and I am having a fabulous time with it! It really is everything they say it is. You can paint on any surface with no priming or prepping-what more could an impatient painter want? Before I painted anything or even purchased the paint I did a lot of reading about it on the internet and watched some You Tube videos. The best videos I found were from a young lady named Christen who has a blog called Blue Egg, Brown Nest. 

My first project was a chest of drawers in our guest bedroom. This chest, and the bed that goes with it, have been in my family for three generations and they have seen better days! There is no way to refinish it with a stain because there are some rather sizable gouges out of the furniture and some of the chest has a very fine thin veneer on it-and some of that veneer is missing in places. So, I thought a nice coat of chalk paint would be exactly what the doctor ordered. It can cover up some of the battles of time and make it into a new treasure with a fresh start.


This is my "before" shot. I think the dresser has great lines and tons of character! I forgot to take a picture of it until I had taken most of the hardware off~but at least I remembered. I'm not very good at taking pictures as I go through a project. I get so into it that I forget someone else may like to see it along the way. 


First I painted the drawers. The details are just gorgeous with the paint on. I am loving this!


Next was the body of the chest. It was so simple to paint and I was more and more thrilled with my Annie Sloan paint as I progressed. Oh-a little bit goes a long way, too. I bought a quart can and barely scratched the surface for this project. 

The bed was as fun as the dresser! We had one of the side rails go missing in this last move, so I have been waiting a while for my husband to make  a new one for me. But before he could do that, it that meant I needed to find bed hooks-that's how the side rail affixed to the headboard and footboard. I finally found some online on a site that sells antique reproduction hardware. 

After the bed was repaired and assembled, I got busy painting it. It was in worse shape than the dresser and I could tell it was happy to be painted and loved again. This is what one of the posts of the footboard looked like before.


And here is the whole bed-I forgot to take a picture before I started, but at least I had only been painting for a few minutes when I remembered. 


And this is how the dresser looked when finished........just a little sandpaper and wax and it was fabulous! I decided to use the old hardware-it gave it the look I wanted.


And here is the finished bed-ready for company. 

With that painting project under my belt, I decided to see what else in my house could use a good coat of paint. I have a mirror and a pair of very tall candlesticks that have caught my eye. :) But before I even got around to painting them I found myself at A Classy Flea where I picked up a round table that I had just the spot for in my bedroom. I can tell that this painting thing could become an addiction! It was grey when I bought it, and I wanted it to be red-but this time all I needed was a sample size jar of Annie Sloan chalk paint. I picked Emperor's Silk. 

I told you I am really bad with "before" pictures and I forgot to take one of the table before I had it upside down and ready to paint. It's really heavy to be such a small table and I didn't want to turn it back over again! So, here it is-upside down. 

I only put one coat of red paint on, took it outside to sand some of the places I wanted to show through and then put on clear wax, followed by dark wax. I really like the way it came out. 


Some of the grey shows through and so does some of the stain that was under the grey paint. My husband thinks it looks like it needs to be refinished-but I love the results.


The next big project in our house is going to be our bedroom. We are going to rip out the carpet and put down a hardwood floor, add wainscoting, and paint. I am going to make new drapes and we're going to put up new rods for them. So, this little table is just a small first step in our master bedroom make-over.

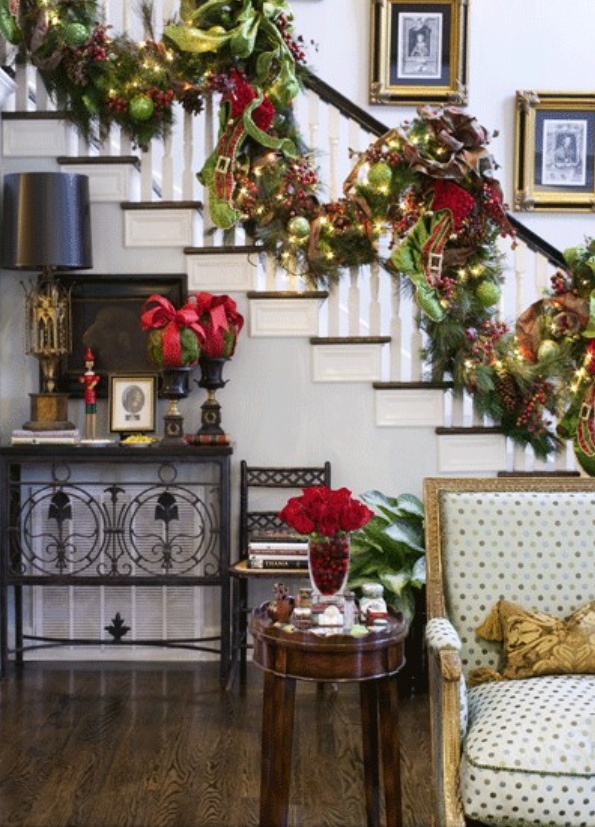
I had a blank wall in my living room that I decided needed some of my attention. I needed a narrow piece of furniture because this was where we walk through this room to get to other rooms in our house. I found this picture and liked the coziness of the table and small chair on this wall-and it even looked like it could be my house with the stairs there. It was my inspiration.


I found a gorgeous old cabinet in an antique mall and it was perfect in that spot. But, I just needed something else to finish out the area. I found a child's chair at another antique mall and it was perfect......except for the color........

I didn't really mind the red--but it was so shiny! It just wasn't going to work. I bought a small jar of grey and I was in business!! A little wax and I was done!

I found the red metal bucket at Hobby Lobby and I put three old books in it. 

And here is my finished project. I have a battery operated candle in the lantern and I have added seasonal decorations in with it. (I had seashells during the summer and I have acorns, leaves and pinecones in it right now.) I bought the wall clock at World Market and the rest are things I had around the house. 

I still have paint left over and I am excited about painting something else-I'll post more pics in the future. For now it's back to the sewing machine.