Apr 18, 2012

Old Family Quilts

I just love old quilts. Wouldn't it be wonderful to snuggle up under an old quilt with a cup of tea and listen to all the great stories it could tell you? When I see a quilt in a museum or antique shop I wonder so many things about it. Who made you? Where did your fabrics come from? Were they left-over scraps from dresses and shirts or where they purchased just for you? Where have you traveled? How did you get to this place in your life?

I am fortunate enough to have several old family quilts. When I was growing up my brother and I each had a quilt that my paternal grandmother had made. Years later, after she died, I was lucky enough to be the recipient of 4 more of her quilts. They were all made in the 1930s and 40's-making them about 70 or 80 years old now.

Now, I know that lots of people would take these quilts and pack them in acid free tissue paper and store them away from light in a box in a closet. But, I want them to be seen, and loved, and appreciated. 

Three of these quilts adorn beds in our home. I have three twin beds in one of our bedrooms and I have decorated this room for our granddaughters. (We have two daughters  who have each given us three granddaughters-for a grand total of 6 girls, 0 boys!) When our granddaughters stay with us they are sleeping and dreaming under quilts that their great-great grandmother made! I think she would be so happy to know that.

The three beds adorned with quilts.

A close up of the quilt on the far left-the 
flowers and leaves are applique and the stems
are embroidered. You can also see the feather 
wreaths that are quilted in the alternating blocks.

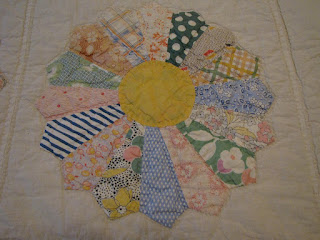
A Dresden plate on the middle quilt. All of the
applique and quilting is done by hand.

Butterfly detail on the right quilt. The butterfly
bodies and wing details are hand embroidered.

The scallop border

I would love to know why my grandmother bought so much of this yellow fabric. All three quilts have the same yellow and muslin scalloped border. The flower quilt also uses it in the alternating blocks and two of the quilts are backed in the yellow fabric. I am glad that the three quilts are so different, yet go so well together in this room.

I have two more quilts that my grandmother made and five other old quilts that I have purchased, or have been given to me. There is just something about these quilts, and their untold stories, that intrigues me. I am adding labels to all of them, with all the information that I have about them. I also talk to my family about them, so long after I am gone, these quilt stories will live on. 

Apr 14, 2012

A Portable Grid

In my last post I talked about how I use my white cutting mat with black lines to help lay out my applique block. If the mat you have is too dark to use this way and you don't want to buy a white one (mine is quite large), I have an alternative solution for you. It is inexpensive AND quite portable. A friend of mine who lives in England looked everywhere for a white mat and this was what we came up with.

I went to Jo-Ann's and purchased an interfacing with a 1" grid printed on it. If you order it online you have to buy a whole bolt, but in the store it is sold by the yard. The blue grid lines printed on it were not quite dark enough for the purpose I needed, so I drew over them with a fine black Pigma Micron pen. Just be sure to put some type of paper under the interfacing to absorb what bleeds through.

Here is what it looked like after I had drawn over several rows. It will give you an idea what the finished product looked like. 

Apr 13, 2012

Love Letters Quilt

I love applique. I really, really love the look of it. I have always been envious of anyone who made applique quilts. Through the years I have taken classes and tried many methods of applique. None of them gave me the look that I wanted-which was needle-turn. So, finally I bit the bullet and decided that I was not getting any younger and if needle-turn was the look I wanted, then I needed to learn to do it. And lots and lots of practice would make me better at it. 

I have a quilting friend named Anne (I call her Annie) who's needle-turn applique is so gorgeous that it almost makes me cry to look at it. Her points and curves are as near to perfection as it gets. So, I went to her to learn to needle-turn. She is a wonderful teacher and I am loving it!! I am not nearly as good as Annie-but she has given me the love of needle-turn. I am enjoying the relaxing feel of fabric and needle in hand. 

For my first ever needle-turn project, I decided to go BIG! I have heard that the smaller the applique piece, the more challenging it can be to handle. So, I figured the reverse must be true. I found this beautiful book by Blackbird Designs and knew that this had to be my first applique quilt. 


The quilt that I am making is called Love Letters. I liked the color palette immediately  because it matches the colors in one of my guest bedrooms, so I decided to just go with it. This quilt appealed to me because each of the blocks is a 28" square, so the quilt finishes at 84" X 84" and the individual pieces are not tiny.

Love Letters

The first thing I did was start collecting fabrics. When working on a project that requires lots of fabrics I like to carry samples with me as I go to local quilt shops or quilt shows. Anne taught me this trick of cutting small pieces and attaching them to a note card or paper. Here was my working sample page.


I wanted to make sure that my background fabrics did not clash and that I got a good variety of fabrics-I like to have large and small scale prints and maybe a check or plaid thrown in. Eventually I had gathered a nice variety of fabrics and was ready to begin.

There were several things that I did before I ever began my cutting and stitching. The first was a trip to Staples. I had the spine cut off of my book and had it spiral bound. It is so much easier to trace applique patterns when the pages of the book lay flat. Second, I made reverse copies of the pages that had patterns for leaves and flowers that needed to be reversed.

My first task for this quilt was to make bias tape. Each of the blocks uses it for the stems and the center block uses it for the wreath. I needed 6 1/2 yards of 3/8" bias tape and 11 yards of 1/2" bias tape. I make my bias strips using the "tube method" (you can find videos and instructions on the internet, if you don't know how) and Clover bias tape makers. I then wrapped my bias tape onto cardboard squares for future use.

The first block that I made for the quilt was my "learning curve" block. There were some things that I decided to do differently on subsequent blocks. I learned that I cannot pin all of my applique pieces into place at once and stitch on a block this large and not get poked and scratched by all the pins. But because all of the pieces need to be placed ahead of time to know they are going to fit and be symmetrical I came up with my own way of doing my blocks. 

I traced each applique pattern onto freezer paper (if I needed four of a particular leaf, I traced four freezer paper leaves), cut it out on the stitching line, ironed it onto the FRONT of my fabric, traced the pattern onto the fabric, cut each piece out leaving a scant 1/4" seam allowance and then removed the freezer paper. I numbered each pattern piece and it's corresponding fabric piece with the same number. 

There is a placement diagram of each block in the book with each square representing 1"-this is SO helpful. I took my background fabric and placed it on my white cutting mat. I can see the 1" grid lines through my background fabric enough to make it easier to place my applique pieces. Next I use my freezer paper pieces and place them onto my background fabric where I want the applique pieces to be. This allows me to move them slightly and fit all the pieces on. I pin each piece in the center when I have them all placed and then I take it to the ironing board and I iron all the freezer paper pieces to my background fabric.

You can see the grid lines through the background fabric.

I then trace all of my freezer paper pieces onto my background fabric using a Pilot Frixion pen. (I know that there is some controversy in the quilting world about whether or not to use these pens on your quilts, but I have not had any trouble with it and will continue to use them.) After I have traced all of the pieces, I number each piece on the background fabric as I remove the freezer paper. 


Lastly, I baste my bias stems down so that the pins don't poke me and come out as I am stitching other pieces. After all of this, I am ready to begin my applique!

I started this quilt in December, 2010. I took the book, freezer paper and fabrics with me to the mountains on a post-Christmas vacation. I traced and cut out all the freezer paper pieces that I needed for the first block-the Hedgeapple. I worked on it some off and on through the next few months, making my way slowly through it (it's my first needle-turn and I was a little apprehensive about it.) In December, 2011 I took it back to the mountains with me again and finished the first block! At this rate, the quilt will take me more than 9 years to complete! I started the second block while I was there and stitched on it a little bit every day the first few weeks of January. Other things got in the way and it slowly made it's way to the background, so I am still working on it. 

The Hedge Apple Block
After I am finished stitching the block I press it lightly with my iron and the heat will remove all traces of the Frixion pen.

The Bur Oak Leaf (so far)

Apr 11, 2012

Star Formation Blocks

I realized the other day that I had not taken a picture of all my Star Formation quilt blocks to show you.  I can't wait to get the sashing cut out and start to put it together. I have been so busy lately helping my daughter get moved into her new house that I have not had a chance to sew. 


Apr 9, 2012

A Quilt Guild Meeting and a Trunk Show

Last Thursday I went with my friend, Judy, to a quilt guild meeting. We have both been looking for a guild that "meets our needs" and so we decided to attend a meeting with a guild that is half way between our homes. I think we have found it! We both had a great time and the ladies seemed very genuine and welcoming.

The program for the meeting was a trunk show by Jane Gorder, who is a prolific Baltimore Album quilter. Her knowledge of antique Baltimore Album quilts was vast. She shared with us about her visits to museums and shows to see antique ones. She has also studied and taken classes with some of the great appliquers in the quilt world. Now she is an authority in applique and Baltimore Album quilts. I loved her show! Thanks, Jane-you are a talented lady.

And then the quilts came out! They were exquisite! She does all needle-turn applique and then hand quilts them all.  I was in awe.  I have been working on my first needle-turn applique project ever and after almost a year and half, I am still on my second block (more about that in a later post)

I apologize for the quality of the pictures. I need to either learn to take better pictures with my phone or remember to take my camera with me. And I was standing in the back of the room, so you get to see the backs of heads too. 

Jane is the lady standing at the far left, in the green shirt.
This quilt is one of the small ones she showed us-yet no detail
is missing-it was exquisite!

Jane told us that traditional Baltimore Album 
quilts do not have sashing between the blocks. This 
quilt, with it's large center block, took my breath away.

This quilt also has blocks of different sizes. My 
pictures do not do justice to her talent.

Here is the traditional 5X5 setting (you can't see 
the bottom row in my pic) of Baltimore Album quilts.

I have never seen one done in blue and white 
before. I think this is a stunning quilt!!

Look how tiny these pieces are!!

This is my favorite one of them all. I am such
a sucker for red and green quilts. I also love 
the border on this one.

Thanks, Jane, for a great show. You have inspired me to get my needle and applique work  out of hiding and work on it again.